How to create your own WordPress website (STEP-BY-STEP GUIDE)
By Philomathes in WordPress
1. Pick a name for your website
Choosing a domain name is equivalent to choosing a company name – it takes a lot of consideration. Your domain name is your identity on the search engine; Make sure that you choose a name that is not only suitable for your business, but it is also very easy to find and promote it. Use keywords that describe your business and the services you provide.
2. Buy host for your website
Every website needs a web host – a lot of companies that provide servers that store your website and make it available online for others to see. Domain registrars usually provide web hosting. It is also possible to purchase domain names and web hosting separately.
Choose a Hosting Plan
Before you start building your website, you will need two things: a domain and hosting for it
There are five main types of hosting available on Namecheap: Shared, Managed WordPress, VPS, Dedicated, and Reseller. For new sites, a good shared hosting account or a managed WordPress account are good places to start because they are cheap and easy to maintain. When a site becomes large, you can upgrade to VPS or dedicated hosting – they provide more bandwidth and disk space to handle the traffic of larger websites, as well as more control over server configuration.
3. Install WordPress
Cpanel is a software used by many web hosting companies. It provides the simplest web-based interface to website owners.
It is a one-stop access to many useful utilities including auto-installer script that helps you install WordPress.
Hosting companies choose which auto-installer scripts they want to use. Generally, the most popular options are Softaculus, QuickInstall and Fantastico.
We will show you how to install WordPress using Auto-Installer. Everyone has a different cPanel, so you can follow the instructions based on the installer you see on your cPanel dashboard.
How to install WordPress using Softaculous
Softcools is a popular auto-installer script. This allows you to easily install popular web applications like WordPress with just a few clicks. Hosting companies such as HostingGone and InMotion Hosting use SoftCools in their control panel.
Just login to your cPanel account and look for the Softcools or WordPress installer icon. You will find them under the Auto Installers section.
Clicking on any of these icons will launch Softaculous Auto-Installer for WordPress. First, you will see an overview of WordPress. To continue you need to click on the install tab.
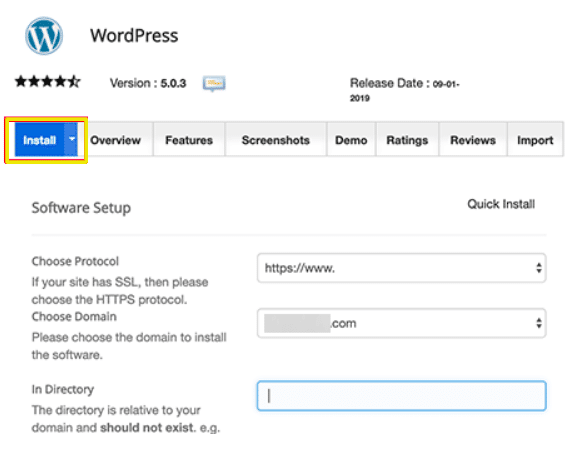
Softcules will now ask you where you want to install WordPress. You need to choose http: // or http: // www. As a protocol.
If your site has SSL and HTTPS, you can select https: // or https: // www. As a protocol.
After that, you will choose the domain name that you have purchased and where you want to install WordPress. Most users want to install WordPress in the root directory of their domain, such as example.com. In that case, you need to make sure that the field ‘directory’ is empty.
If you go down a bit, you will have the settings section of your site.
Under this section, first you have to provide a title and description for your WordPress site. After installation you can easily change these from your WordPress admin area.
Next, you need to choose an administrator username, password and email address. Softcules will automatically fill in the username and password fields for you. It will use a non-dictionary word and a strong password for the username.
You can change them if you want so that they are easier for you to remember. However, we always urge you to use a strong password. To learn about the best way to manage passwords for WordPress beginners check out our guide on how you can easily manage strong passwords.
Make sure you enter the correct email address in the admin email field. If you have forgotten your password, WordPress will send notifications and a password reset link.
The rest of the options on the screen are optional. Now you can click on the install button to run the installer.
Softcules will run the installer using the settings you have provided. You will see a progress bar with installation status. This may take several moments. Do not close the window until the progress bar reaches 100%, this may affect your WordPress installation.
4. Install a theme
These are the basic steps:
- Log in to your WordPress admin page, then go to Appearance and select Themes.
- To add a subject, click Add New. From this page, you have two ways to add a new topic. If you know the name of the theme you want, search in the theme directory. If you don’t know the name of your favorite theme, use the Feature filter to improve your selection, check any tag, and click on Apply Filter for a screen full of topics that meet your search criteria. .
- Before choosing one, you can see the demo of the theme and choose either preview and after that you can install it by clicking on the install button when ready. Once installed, click on the Activate link.
- After all the work is done you preview your site to see how it looks.
- We recommend reading through any instructions that come with your chosen topic regarding installation. Some subjects will require more stages than others, which are beyond the basic steps covered here. Follow the instructions given, and if you run into any problems, contact the author of the topic for help.
5. Install plugins and activate them
Installing a WordPress plugin from within your dashboard is one of the easiest ways to get a plugin up and running fast. The first thing you do is under the Plugins section of your WordPress dashboard, click “Add new”. You can then search for the plugin you want to install. In our example, we type SEO. You can also browse select, popular and recommended plugins. Then click on the one you want to install.
Then click “Activate”.
And that’s it! Your plugin is now installed, activated, and ready to use. Most plugins, especially large ones, will have an options menu that can appear on the left side of your WordPress dashboard. For example, with the Yoast SEO plugin we now have an “SEO” menu in which we can now dig into the settings of the plugin.
6. Add content to your website
You can add any type of content to your website. Such as articles, audio, case studies, ebooks, whatever you want to put.
Log in to your WordPress website.
If you are adding your content through a new post: Click Post> Add New. Add your new content with a title. If applicable, select the appropriate categories for the post in the Categories section (right column).
Content also works to make your website beautiful. If you add content to the website well then your website will have a different effect on people.
7. Continue evolving your website
You have invested time, money and effort in developing a website, but you know how to develop your website. Websites need to be changed again when our competitor and market change. You have to improve your website every 2-4 years to maintain a quality user experience. Even in the last five years, focusing on content and changing the Google algorithm has raised expectations from both search engines and users.
Leave a Comment
You must be logged in to post a comment.